11 Finite Element Analysis Model
11.1 Concept of the Finite Element Method
The finite element method is founded on approximate solution techniques for boundary-value problems consisting of differential equations and boundary conditions. Approximate solution methods for boundary-value problems are mathematically represented by the Ritz method and the Galerkin method. An approximate solution method for a boundary-value problem can be summarized as follows: a linear combination of known functions (basis functions) that satisfy the geometric boundary conditions, i.e. the essential boundary conditions—that is, a function obtained by multiplying the basis functions by constants and summing them—is taken as the unknown trial function, and the optimal constants are determined. Thus, the problem is effectively transformed into one of determining constants, and the solution is obtained approximately. Here, the accuracy of the solution varies depending on which functions are used as basis functions.
The finite element method is based on a systematic way of generating these known functions, namely finite element interpolation. Finite element interpolation begins with discretizing the analysis domain into nodes and elements. Prior to analysis, the object to be analyzed is cut into elements and nodes that satisfy certain rules; this is called finite element discretization, and defining one interpolation function (a kind of basis function) at each node is called finite element interpolation. A discretized finite element analysis model consists of a set of finite elements defined by nodes, and one known function, i.e. an interpolation function or shape function, is defined regularly at each node. This interpolation function has the property that it has a function value of 1 at that node and a function value of 0 at all other nodes. Therefore, in the linear combination of these interpolation functions, the coefficient means the nodal value of that function. This is because the only interpolation function that is nonzero at that point is the interpolation function defined at that point, and its value is 1. Such interpolation functions have the advantage that they make it easy to satisfy the essential boundary conditions. However, if you consider the accuracy of the solution by focusing on the interpolation functions, you will be disappointed.
This is because the shape of the function differs greatly from the solution. However, according to theory, if the number of interpolation functions satisfying the essential boundary conditions is increased one at a time, the accuracy of the solution gradually improves and ultimately approaches the exact solution. Increasing the number of known interpolation functions means increasing the number of nodes. Usually the number of elements is used as a measure of degrees of freedom, but theoretically it is correct to use the number of nodes as the basis. Increasing the number of interpolation functions results in an increase in the unknowns, i.e. the degrees of freedom, and this problem is solved by the computer. In approximate solution methods for boundary-value problems, the accuracy of the analysis result fundamentally depends on the quality of the known functions. Therefore, the discretization of the analysis domain, i.e. mesh generation, is important.
If linear elements are used in finite element analysis, the edges of the elements connecting nodes, i.e. the line segments, remain straight. Consequently, the stiffness of the elements becomes larger than the actual value, so the forming load obtained from the finite element analysis is inevitably somewhat larger than the actual forming load. The foregoing is the mechanical, mathematical, and technical background that made the finite element method possible. Basic knowledge of the finite element method is summarized in Appendix B.
In conclusion, the quality of the mesh is the most important thing in the finite element method. Since the finite element method finds the optimal solution that can be constructed with the interpolation functions used, the quality of the mesh determines the accuracy of the solution. If the number of elements is increased, the number of nodes will increase, and in general the accuracy of the solution improves. However, in three-dimensional analysis, computation time can become an issue. And in metal forming simulations that involve remeshing, increasing the number of elements generally increases the number of remeshing operations as well. Remeshing brings about artificial changes in the analysis boundary and numerical changes in the state variables.
Therefore, the technique of raising accuracy while cutting the analysis object into an appropriate number of elements is important. Regions with large plastic deformation must be cut relatively finely, whereas regions with little deformation may be cut relatively coarsely. The optimal mesh generation technique that takes into account the finite element interpolation error is called adaptive mesh generation, and the mesh generation technique that considers future contact conditions and so on in metal forming simulation is called intelligent remeshing.
In the two-dimensional case, triangular elements and quadrilateral elements are generally used, and in the three-dimensional case, tetrahedral elements and hexahedral elements are widely used. Empirically, quadrilateral elements and hexahedral elements are free from the so-called numerical locking problem. However, triangular elements in two dimensions and tetrahedral elements in three dimensions are exposed to the numerical locking problem. In a tetrahedral mesh, the number of elements is generally about five times the number of nodes, so the numerical locking problem occurs. In contrast, in a hexahedral mesh the number of nodes is greater than the number of elements, so this does not happen. When using a triangular mesh or a tetrahedral mesh, a special method must be used to resolve the aforementioned numerical locking problem, and a representative such method is the use of the triangular MINI-element or the tetrahedral MINI-element. In fact, if there were no other problems, quadrilateral elements and hexahedral elements, which have no numerical problems, would be advantageous. However, automatic remeshing of hexahedral elements is not easy. Therefore, in practice, one alternative can be to use quadrilateral elements in two dimensions and tetrahedral elements, for which automatic remeshing is possible, in three dimensions.
Of course, most commercial software provides a mesh-density optimization function. However, for special problems, generation of an optimal mesh through user intervention may be necessary. Meshes generated for such purposes can be seen in Figure 11.15 (fine blanking process) and Figure 11.16 (coining process).
The number of elements (in fact, the number of nodes is more important; however, since the number of elements and the number of nodes are in a proportional relationship, the number of elements is usually used instead of the number of nodes) has some influence on the prediction results. However, if a sufficient number of elements is used to represent the surface of the workpiece, the overall prediction result is not greatly affected. For example, Figure 11.1 shows the effective strain distribution obtained as the analysis result of an upsetting process; in Figure 11.1(a) about 500 quadrilateral elements were used, and in Figure 11.1(b) about 5000 were used, but it can be seen that the results are not greatly different. Even though the number of elements was made extremely small, the effective strain rate distribution still satisfies symmetry. And as shown in Figure 11.2, it can be confirmed that the difference in analysis results according to the number of elements in the mesh is not large. The smaller the difference in analysis results according to the number of elements, the more stable the software can be said to be. Therefore, this point can be an important consideration in evaluating the reliability of the software.

(a) 500 quadrilateral elements (b) 5000 quadrilateral elements
Figure 11.1 Strain rate distribution according to the number of elements
11.2 Quadrilateral Mesh
Triangular elements and quadrilateral elements are used as elements for the finite element analysis of two-dimensional boundary-value problems. Generation of a triangular mesh is relatively easy and has the advantage of generality. However, there is the problem that the element stiffness increases numerically. This is because the ratio of the number of elements to the number of nodes is relatively large compared with a quadrilateral mesh. That is, elements reduce degrees of freedom because of the volume-constancy condition, whereas nodes increase the number of unknown variables (velocity/displacement, hydrostatic pressure), i.e. the degrees of freedom.
On the other hand, although the quadrilateral mesh has the aforementioned advantage over the triangular mesh, the problem is that many difficulties accompany mesh generation. For example, generating a quadrilateral mesh for an analysis domain with a sharp shape is not easy. However, from the standpoint of numerics and result accuracy, the quadrilateral mesh is advantageous, and because most analysis domains arising during metal forming analysis can be discretized with a quadrilateral mesh, the tetrahedral mesh is advantageous overall. Maintaining geometric information such as boundary conditions and singular points during remeshing is important. This is because if these change, the boundary-value problem itself changes significantly. And during remeshing, a comprehensive evaluation must be made and a decision reached as to whether the nodes representing the boundary of the workpiece are likely to separate from the die and whether they are likely to make new contact. And in metal forming process analysis, the perpendicularity of surface element boundaries and the perpendicularity of internal elements have an important influence on the analysis results. When the perpendicularity of a surface element to the surface is poor, oscillations in surface stress and the like occur, which can have some influence on the accuracy of the solution.
An automatically generated quadrilateral mesh is shown in Figure 11.3, and the detailed content is deferred to reference [11.1].

(a) Die (b) Forging process

(c) Element density control
Figure 11.3 Quadrilateral mesh
11.3 Tetrahedral Mesh
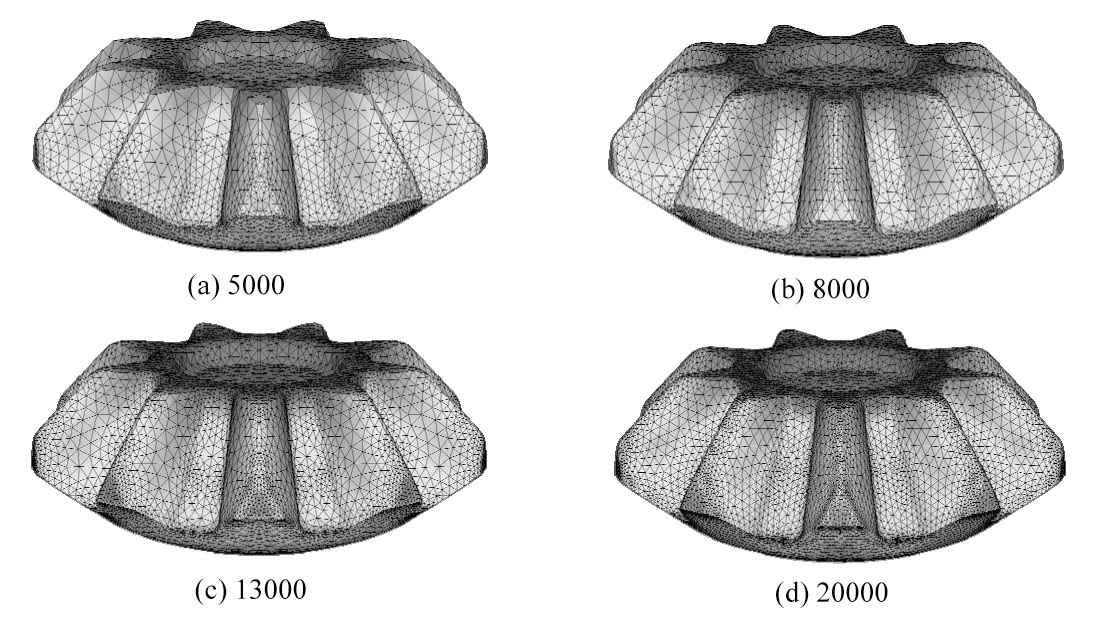
Various types of finite elements are used for the analysis of three-dimensional boundary-value problems in which the analysis domain is fixed. Hexahedral elements, tetrahedral elements, and pentahedral elements are examples. However, the only mesh that can realistically be used for metal forming, in which the shape of the analysis domain changes in a complex manner during the analysis, is the tetrahedral element. A tetrahedral mesh is automatically generated by the Delaunay triangulation technique, and a practical tetrahedral mesh generation program can be summarized as the Delaunay triangulation technique reinforced with mesh-density control, optimization, and intelligence functions to improve mesh quality [11.2].
The left side of Figure 11.4 shows the element density required during the analysis, and the figure on the right shows the generated mesh that satisfies this requirement. As shown in the figure, the generated mesh reflects the desired element density well. Figure 11.5 shows a typical mesh during metal forming simulation, and Figure 11.6 shows an example of remeshing based on the user's element-density specification. As shown in these figures, tetrahedral mesh generation technology has the advantage that it can be developed to suit metal forming simulation.
In general, in a tetrahedral mesh the ratio of the number of elements to the number of nodes, i.e. the value of (number of elements / number of nodes), exceeds 5.0. Therefore, if the incompressibility (volume-constancy) condition is applied element by element, an over-constraint problem arises, and this is called numerical locking.
To resolve this problem, the tetrahedral MINI-element is widely used [8.3, 11.3].

(a) Required desired element density (b) Generated tetrahedral mesh
Figure 11.4 Density control of a tetrahedral mesh

emphasized contact boundary

(inner race)


Figure 11.6 Three-dimensional remeshing based on the user's element-density specification
11.4 Remeshing
Meanwhile, as shown in Eq. (8.14), Eq. (8.15), Eq. (8.103), Eq. (9.8), and Eq. (10.29), the computation process is based on integration. The integration for each element is mapped to a standard integration interval and computed by numerical integration, and at this point constraints on the element shape arise. If, as the analysis of a metal forming process proceeds, integration becomes impossible due to severe deformation of the elements, it becomes inevitable to remake the elements. This is called remeshing. This is a characteristic problem of bulk metal forming process analysis. In the process of forming the finite element equations in a metal forming simulator, each element is mapped to the standard interval; here the so-called Jacobian must be positive for the original domain and the domain mapped to the standard interval to have a one-to-one correspondence, and only in this case is integration possible. If an element becomes severely distorted—that is, if \(\alpha\) in the quadrilateral element of Figure 11.7(a) becomes negative—the Jacobian becomes negative and the solution can no longer be obtained by normal means.
In actual analysis, in order to keep the quality of the mesh good, remeshing is triggered when the value of \(\alpha\) becomes smaller than an input value \(\alpha_a\). The distortion of the mesh itself is important, but among the factors that govern the analysis results, appropriately maintaining the contact condition between the workpiece and the die is also important. For example, as shown in Figure 11.7(b) and 11.7(c), when using linear elements, which are the most commonly used, the boundary of the workpiece is defined by connecting the outer nodes. Therefore, during metal forming simulation, penetration of the workpiece into the die is unavoidable. When two adjacent nodes on a curve are connected, it is inevitable that the boundary of the workpiece either departs from the die or that an empty space arises between the die and the workpiece. If the metal forming simulator is intelligent above a certain level, the latter rarely appears during metal forming simulation. In contrast, the former appears very frequently. Even though the mesh has not become distorted, a situation arises in which remeshing must be performed. What is needed here is to regulate the depth to which the workpiece can penetrate the die. The allowable die-penetration depth of the workpiece, one of the main input variables, is relatively strongly affected by the size of the forged product, and some empirical factor can help determine this value.
Besides what has been described above, there are various cases in which remeshing is necessary. However, remeshing inevitably produces errors that cannot be ignored. First, remeshing changes the shape of the workpiece surface, and this error can be much larger than the influence of elasticity. And internally, it inevitably causes numerical smoothing of state variables, including history variables such as effective strain. Smoothing of state variables tends to reduce maximum values and increase minimum values, and the degree of smoothing can be greatly influenced by the quality of the elements. Increasing the number of elements generally improves the accuracy of the solution, but in metal forming process simulations that require remeshing, the situation can be different. As the number of elements increases, the frequency of remeshing increases, the numerical error of the boundary and state variables increases, and the overall result may turn out to be worse. Of course, this problem can be overcome to some extent by local remeshing.

(a) (b) (c)
Figure 11.7 Cases in which remeshing must be performed
11.5 Desirable Mesh
The following is a one-dimensional boundary-value problem for grasping the characteristics of finite element analysis results.
The exact solution of this boundary-value problem is
The characteristic of this boundary-value problem is the super-convergence property of predicting the exact answer at the nodes.
Figure 11.8 compares the finite element solutions obtained with three different meshes. As shown in this figure, the exact answer is predicted at the nodes. Therefore, in general, as the number of nodes, i.e. the degrees of freedom, increases, the accuracy of the solution improves. However, increasing the number of nodes does not unconditionally increase the accuracy of the solution as much as expected. As shown in the figure, even if an additional node is added to the left element in the three-element mesh, the accuracy of the solution is not greatly affected. Theoretically, a local modification of an element that reflects an additional node imposed on an existing mesh unconditionally improves the accuracy of the analysis result. Figure 11.8 intuitively tells us that it is desirable to distribute many nodes in places where the solution changes sharply.

(a) (b) (c)
Figure 11.8 Comparison of solutions according to the mesh
Based on the foregoing argument, the finer the mesh—especially the finer the mesh in the parts where the state variables change greatly—the more the accuracy of the solution improves. In structural analysis, this logic holds. However, in the analysis of bulk metal forming processes that require remeshing, this is not the case. This is precisely because of remeshing. Remeshing artificially changes the shape of the outer skin, which is emphasized in metal forming, and internally causes smoothing of state variables including strain. Changes in the outer skin have a large influence on local numerical changes in shape, and through artificial volume changes they also directly and indirectly affect the overall shape and forming load. In the remeshing process, a procedure is required in which element values are converted to nodal values and these nodal values are again converted to element values; this process generally results in artificially lowering local maxima and, conversely, raising local minima, and this is numerical smoothing. Therefore, it is desirable to reduce the frequency of remeshing and, when necessary, to make appropriate use of local remeshing techniques. Therefore, unlike structural analysis, where a larger number of nodes is advantageous from the standpoint of solution accuracy when the element density is good, a mesh composed of appropriate degrees of freedom and element density is a more desirable mesh than a fine mesh. Figure 11.9 is an example of desirable meshes. These meshes represent the shape of the workpiece to a sufficient degree while having a small number of elements. Of course, a desirable mesh must have an element density sufficient to adequately represent the gradients of the state variables internally.


Figure 11.9 Examples of desirable meshes
And since the metal forming process analysis problem is a representative boundary-value problem, the change in boundary conditions before and after remeshing must be minimized. Therefore, appropriate representation of the die-workpiece contact boundary is also important. Figure 11.10 shows an example of intelligent remeshing that emphasizes changes in boundary conditions. As shown in the two-dimensional intelligent mesh generation example of Figure 11.10(a), it can be seen that the surface element density on the left and the pressure distribution on the right are in some correlated relationship. This is the result of adjusting the element density, during remeshing, around points of contact instability or points where the boundary condition may change. As can be seen before and after remeshing in Figure 11.10(b), one gets the impression that the contact boundary is kept alive before and after remeshing.

(a) Two-dimensional

Before remeshing

After remeshing
Figure 11.10 Example of intelligent remeshing that emphasizes changes in boundary conditions
11.6 Examples of Special Meshes
11.6.1 Skin Mesh
In hot metal forming processes, the influence of the actual diffusion term is large, and because of the uncertainty of thermal information, isothermal analysis can be advantageous for engineering analysis purposes, i.e. for predicting flow lines, forming load, presence of defects, and so on. However, in recent times, for the analysis of metal forming processes, non-isothermal analysis, which from a theoretical standpoint is more similar to the actual process, is being widely performed. This trend is expected to grow along with the advancement of metallurgical prediction technology. Non-isothermal analysis technology [11.4] was theoretically established in the 1970s, but there still remain problems that must be resolved before application. To increase practicality, an understanding of numerical problems [11.5] must precede application, along with securing high-accuracy thermal information.
In non-isothermal analysis problems, the mechanical uncertainty at the contact surface between the die and the workpiece is large. The heat transfer between the two contact surfaces is generally formulated as a convection condition, but the uncertainty of the heat transfer coefficient is very high. Moreover, although convective heat transfer and conductive heat transfer at the surface must be equal, in order to satisfy this condition an appropriate mesh must be used. Convective heat transfer is calculated from the heat transfer coefficient and the temperature difference, and the initial value, being a known value, is not small in magnitude. For the conductive heat transfer that satisfies this to occur, a mesh capable of representing a temperature gradient of a certain magnitude must be used [11.5]. If extremely coarse elements are used, large errors in the boundary conditions are inevitably produced.
In this section, by clarifying the causal relationship between the mesh and the non-isothermal analysis results using skin elements, we aim to establish intuition for obtaining high-accuracy non-isothermal analysis results.
Figure 11.11 is a hot upsetting process and shows the workpiece and die to which skin elements are not applied. The flow stress of the workpiece is as shown in Figure 11.11, and the friction coefficient is assumed to be 0.2. The workpiece is AISI 1020 (\(T=600-1300^\circ\text{C}\)), and the die material is die steel. The initial temperatures of the workpiece and die are \(1100^\circ\text{C}\) and \(300^\circ\text{C}\), respectively. The punch velocity is assumed to be 200mm/s.
The boundary condition at the contact surface is expressed by the following equation.
Here, \(h\) is the heat transfer coefficient, and \(k\) is the thermal conductivity. \(T_\infty\) is the ambient temperature.
When the workpiece first contacts the die, the right-hand side of Eq. (11.1) is a very large value, and all values except the temperature gradient \(\nabla T\) can be regarded as fixed. Therefore, when the temperature difference between the workpiece and the atmosphere is large so that the temperature gradient is large, the temperature prediction result can be strongly dependent on the quality of the surface mesh. For example, in hot rolling of thin plate, where large temperature changes occur, in order to represent the large temperature change occurring at the surface of the rolling roll, a high-density mesh concentrated on the roll surface must be used. To understand this problem, analysis of the influence of skin elements is meaningful.

(a) General mesh

(b) Skin mesh (5 skin-element layers,
total skin-element thickness = 0.6mm)
Figure 11.12 is the analysis result using a skin mesh (Figure 11.11(b)) in which the total thickness of the skin-element layer is 0.6mm and the number of skin-element layers is 5. As shown in this figure, it can be seen that the temperature distribution changes sharply in the contact region.

Figure 11.12 Finite element prediction result (5 skin-element layers, total skin-element thickness = 0.6mm)
Figure 11.12 compares the analysis result obtained without using skin elements with the analysis results obtained using skin elements with a total thickness of 0.6mm and 1, 2, 3, 4, 5, 10, and 15 skin-element layers. From this figure, the temperature distribution obtained without using skin elements shows a clear difference from the temperature distributions using two or more skin-element layers. The single-layer skin element shows a distinct difference from skin elements of two or more layers. Overall, the use of skin elements results in a non-negligible predicted difference in die temperature. This difference is a value that has a non-negligible influence on the die life evaluation result. According to Figure 11.13 (the temperature distribution in the thickness direction at the measurement points of Figure 11.11), a 0.2mm skin element can be said to be sufficiently small to reflect the thermal shock caused by the sharp temperature difference that occurs in the example problem of Figure 11.11.

(a) Die

(b) Material
11.6.2 Other Special Meshes
(1) Two-dimensional complete analysis
Complete analysis refers to analysis that takes into account the elastic deformation of the die. For the purpose of this analysis, contact treatment of all die components must be performed, and a mesh configuration suitable for this is needed. It is desirable to keep the difference in element density at the contact surfaces from being large. Figure 11.14(a) shows the initial mesh for the complete analysis of an axisymmetric hot forging process.

(a) 2 complete analysis

(b) Mannesmann roll piercing

(c) Clad sheet metal
(2) Mesh for Mannesmann roll piercing
For the analysis of the Mannesmann roll piercing process for manufacturing seamless pipe, as shown in Figure 11.14(b), it must be possible to appropriately represent the shape of the nipple portion, and an element density is needed that allows stable contact between the roll and the material. However, if the nipple portion is made too fine, frequent remeshing is required. And if too coarse a mesh is used, the void that is important in the analysis of the Mannesmann roll piercing process may not be represented, as shown in the figure.
(3) Clad sheet metal
Considering surface quality, structural stability, cost, and so on, clad sheet metal is widely used. A representative example is aluminum sheet coated with titanium. The mesh for such clad sheet metal can only be generated by layering. An appropriate number of layers is important. An increase in the number of layers results in an increase in the number of elements, while a low number of layers has the problem of not sufficiently representing the stress variation in the thickness direction. For efficient analysis of this problem, because remeshing is not easy during the analysis, controlling the density of the initial mesh in consideration of the deformed shape is the key. An application example is shown in Figure 11.14(c).
(4) Fine blanking
Figure 11.15 shows a mesh for fine blanking. Appropriate regions must be selected to impose the element density, and for the analysis of the fine blanking process, sharp changes in element density are unavoidable. This is because very small elements must be used where shearing occurs. In other regions, it is sufficient to use enough elements to accurately represent the shape.

Figure 11.15 Mesh for fine blanking of sheet metal
(5) Mesh for coining process analysis
Coining process analysis is a special problem in which the quality of the surface elements must be raised to an extreme degree. Because this inevitably produces an excessive number of elements, it is an extreme problem that determines the performance of the computer and the special functions of the software. Figure 11.16 is an example applied to a hypothetical coining problem.

Figure 11.16 Mesh for coining process analysis
(6) Mesh suitable for ring rolling A mesh suitable for ring rolling is shown in Figure 11.17(a). In the ring rolling process, the contact surface continuously changes. In such a case, it is desirable to use a mesh suited to the history of contact-surface changes. Otherwise, frequent remeshing is required, and this inevitably causes inaccuracy of the results.

(a) Mesh suitable for ring rolling

(b) Mesh considering cooling channels

(c) Quasi-steady-state analysis
(7) Mesh considering die cooling channels
Figure 11.17(b) shows a mesh for analysis that takes into account cooling channels drilled for the purpose of die cooling and the like. Because the creation of cooling channels causes a sharp increase in the number of elements, one must simultaneously consider maintaining solution accuracy and the efficiency of computation time.
(8) Quasi-steady-state analysis of the porthole extrusion process
In the analysis of the porthole extrusion process, the initial process in which the material passes through the chamber requires much effort relative to its engineering usefulness. For such a problem, it can be desirable to regard the steady state as having been reached at the outset and to perform the analysis for a certain period of time from then on to grasp the behavior characteristics of the material. Figure 11.17(c) is an initial mesh for this purpose, i.e. the quasi-steady-state analysis of the extrusion process.
(9) Mesh for multi-body analysis
Multi-body analysis is one of the difficult problems in the analysis of metal forming processes. For this reason, not many application examples of the related analysis technology have been reported. Figure 11.18(a) and Figure 11.18(b) show meshes for two-dimensional and three-dimensional multi-body analysis, respectively.

(a) Two-dimensional

(b) Three-dimensional
11.7 Artificial Volume Change and Numerical Smoothing of State Variables
11.7.1 Artificial Volume Change
In general, plasticity theory assumes that there is no volume change during metal forming. In other words, as in fluid mechanics, an incompressibility condition is generally attached. However, actual metal forming simulation inevitably entails a volume change. The causes can be broadly divided into three. The first stems from the theory related to the technique for handling the incompressibility condition. The incompressibility condition is usually handled by the Lagrange multiplier method and the penalty method [1.1], and among these, the penalty method handles the incompressibility condition approximately, so depending on the penalty constant it causes a slight volume change. In addition, an excessively large penalty constant causes partial uncertainty in the plastic flow. For example, in a two-dimensional axisymmetric problem, it can produce unreliable results around the central axis.
Of course, the Lagrange multiplier method entails an increase in the number of unknowns. That is, an increase in unknowns equal to the number of elements occurs. Therefore, when analyzed with the same elements, the Lagrange multiplier method is advantageous in terms of accuracy but disadvantageous in terms of computation time.
The second cause of volume change is related to the updating of the velocity field. The analysis of forging and other metal forming processes is a repetition of the process of finding the velocity field at one instant and advancing it by the time increment input by the user. As shown in Figure 11.19, in the implicit method the velocity field for one instant around the middle of the time increment is found, and then the nodes are advanced, so the deformed shape is calculated step by step. In contrast, in the explicit method the velocity field at the start of the time increment is calculated. Therefore, basically, in the explicit method many variables are already determined, so it is advantageous in terms of computation time and obtaining the solution, but compared with the explicit method it is greatly disadvantageous in terms of accuracy, volume change, and so on. The implicit method has the advantage that the time increment can be made relatively large, but it is necessary to remember that the larger this value is made, the larger the volume change becomes. As a countermeasure for this second cause, the best approach is to accumulate direct and indirect experience regarding volume change through a repeated process of analyzing extrusion and upsetting processes without using the volume-compensation function and then checking the volume change rate.
Let us take a simple upsetting process as an example. Figure 11.20(a) and Figure 11.20(b) show, respectively, the upsetting process used in the test and the correlation between the number of analysis steps and the volume change. Too small a number of analysis steps causes a relatively large volume change. This volume change can be compensated for by numerical techniques during the analysis, but the inaccuracy of the result cannot be fundamentally prevented. In the case of this process, it can be confirmed that at 50 or more analysis steps the result falls within an acceptable error range.

Figure 11.19 Implicit method

(a) Upsetting process used in the test
| Number of analysis steps | Volume change rate (%) |
|---|---|
| 19 | 1.18 |
| 24 | 0.84 |
| 31 | 0.74 |
| 52 | 0.28 |
| 68 | 0.28 |
| 86 | 0.02 |
(b) Number of analysis steps and volume change
The third cause of volume change is numerical in nature, arising from remeshing. In the finite element method, the shape of the workpiece is basically defined by the connection of nodes on the outer boundary or surface. Therefore, remeshing inevitably entails a volume change. In particular, in the three-dimensional case, because the die is generally cylindrical in shape, the volume tends to decrease as the number of elements decreases. Therefore, the volume can be said to be sensitively affected by remeshing. For this problem too, the solution depends on the user's empirical factors and the degree of intelligence of the software.
Comprehensively speaking, volume change is directly linked to the reliability of the prediction result, and it is a matter to which the user must always pay attention. As mentioned above, most commercial software provides an artificial compensation function for the volume change that inevitably occurs during analysis, but we emphasize that relying on this uncritically is not an appropriate solution. Insight into volume change and the technique for dealing with it are among the core knowledge and skills that a user must possess.
11.7.2 Numerical Smoothing of State Variables
Remeshing entails mapping (transformation) of state variables, especially history variables such as strain and damage. That is, the element values and nodal values after remeshing must be calculated from the information before remeshing. Finite element results allow some discontinuity at element boundaries. For example, when using linear elements, if the continuous state variable expressed by the interpolation function is differentiated, the result becomes discontinuous at the element boundaries. Because of this problem, the values must be converted to continuous values during the mapping process. Here, in the same manner as the finite element interpolation method, the state variable is expressed by continuous interpolation functions and nodal values, and the error between this continuous state variable and the element values is minimized. The least-squares method can be used here.
The least-squares method fundamentally tends to reduce maxima and raise minima. This is called numerical smoothing.

(a) Mesh

(b) Intuitively obtained answer

(c) Answer by the least-squares method
Let us understand this through the simple example of Figure 11.21(a). The mesh consists of two quadrilateral elements, and as shown in Figure 11.21(b), the element value of element 1 is 1.0 and the element value of element 2 is 2.0. In this problem, the nodal values intuitively obtained at nodes 1, 2, and 3 are 0.5, 1.5, and 2.5, respectively. If these nodal values are connected, as shown in Figure 11.21(b), the result is a straight line that makes the error (the hatched portion) equal above and below. However, when the optimal nodal values are obtained by the least-squares method, this does not happen [1.1]. The solid line shown in Figure 11.21(c) is obtained. If the element values are again obtained based on these nodal values, they become 1.125 in element 1 and 1.875 in element 2. Therefore, the original values are forgotten.
The hollow-head forming process during the forging of the ball-stud with cavity in head shown in Figure 11.22 is a good example that makes it easy to understand the smoothing phenomenon of damage caused by remeshing while imparting an appreciation of its importance. The damage model used in this example is the normalized Cockcroft-Latham model, and because damage always accumulates at any given point, damage must always increase as time increases. The hollow-head forming process of Figure 11.22 requires a large number of remeshing operations. This is because of the geometric characteristics of the hollow-head portion. In contrast, almost no forming occurs in the lower portion. Therefore, at the beginning of forming, the damage value of 0.43 generated in the previous stage should at least be maintained. However, this decreased to 0.37. This phenomenon is precisely due to the numerical smoothing of the state variable. To prevent numerical smoothing, it is desirable to reduce the number of remeshing operations within a range that does not compromise the shape error, and in some cases it is necessary to make use of local remeshing.
Above all, what is important is the ability to understand this phenomenon and, when evaluating results, to correctly judge the results in consideration of the numerical techniques used.

Figure 11.22 Example of damage smoothing that occurred during the analysis of the hollow-head forming process of a hollow-head ball-stud
11.8 Two-Dimensional and Three-Dimensional Analysis
11.8.1 Introduction
Two-dimensional problems are broadly divided into axisymmetric problems and plane-strain problems. Of course, a two-dimensional problem can be analyzed in three dimensions. In fact, many engineers attempt this. However, the following points must be kept in mind. When a two-dimensional forging process is analyzed using quadrilateral elements, there is almost no room for numerical problems to intervene, so a more stable answer can be obtained economically compared with three dimensions. However, the three-dimensional approach inevitably yields somewhat less reliable answers than the two-dimensional approach. In other words, when the same problem is solved in two and three dimensions, if the solutions differ slightly, the two-dimensional solution is inevitably more accurate. In particular, we emphasize that because the quadrilateral element and the tetrahedral element used in this book have different theoretical backgrounds, a difference in results inevitably exists. If the software used triangular elements and tetrahedral elements, the difference between the two results would be further reduced, but it is considered fundamentally impossible to reduce the difference below a level where it can be ignored. And we emphasize that the solution of the quadrilateral element is relatively more stable than that of the triangular element and, under the same conditions, is inevitably more accurate.

(a) Cold forward-backward extrusion

(b) Cold backward extrusion

(c) Automatic multi-stage cold forging
Figures 11.23 and 11.24 compare the two-dimensional analysis results (quadrilateral elements) and three-dimensional analysis results (tetrahedral elements) for axisymmetric and plane-strain problems, respectively, and show that the two results are similar to each other. In Figure 11.23(a), the loads are compared, and it can be seen that the forming loads predicted in two and three dimensions are similar over all intervals except the very last. Because the forming load at the very last instant is strongly affected by volume change and so on, the comparison itself has little meaning.

Figure 11.24 Comparison of two-dimensional and three-dimensional analysis results for a plane-strain problem
Figures 11.25 and 11.26 compare and analyze the two-dimensional and three-dimensional analysis results for an axisymmetric problem in more detail using plastic flow lines. As shown in the figures, they exhibit similar deformation patterns overall. However, upon detailed examination, it can be confirmed that the three-dimensional analysis result reflects smaller friction at the center than the two-dimensional result. This is because the slope of the plastic flow lines at the center is a function of the accuracy of the friction.

Of course, when the number of elements is reduced in three-dimensional analysis, this phenomenon becomes more severe. As emphasized earlier, this point is somewhat unavoidable. In three dimensions, because of the constraint on the number of elements, applying friction strictly can cause an over-constraint problem. In other words, in this problem high pressure acts at the center, and the friction coefficient of 0.3 combined with the high pressure creates a sticking condition at the surface nodes of the center, but satisfying this over-constrains the plastic flow of the interior nodes at the center, where the number of elements is not large. This can be a factor that makes it difficult to obtain a converged solution.
Figure 11.26 also shows similar results. That is, although the results are similar overall, the plastic flow lines at the center show some difference. However, that difference is generally negligible. In fact, this difference is not large compared with the difference between the Coulomb friction law and the constant-shear friction law explained in Chapter 5.

11.8.2 Three-Dimensional Deformation of an Axisymmetric Problem Due to Buckling
The problem of Figure 11.27 is geometrically identical to the example of the previous section in that it is axisymmetric, but it differs greatly in terms of mechanical phenomena. In the three-dimensional analysis, wrinkles were predicted on the inner diameter. This problem is geometrically axisymmetric, but due to the buckling phenomenon it belongs to the category of problems that are mechanically asymmetric. That is, this is a case in which analysis performed by regarding the process as axisymmetric cannot accurately reflect the actual situation.
Similarly, as shown in Figure 11.28, the buckling phenomenon that occurs during the compression forming of a long workpiece cannot be predicted by two-dimensional analysis. To predict the buckling phenomenon, the analysis domain must be set so that there is only one plane of symmetry or no plane of symmetry. And because there is some degree of non-axisymmetry in terms of the cut plane or the properties of the material, it can be desirable to impart asymmetry to the initial shape of the workpiece, as shown in Figure 11.28(b), in order to reflect this.

Figure 11.27 Example that is geometrically two-dimensional but undergoes three-dimensional deformation

11.8.3 Two-Dimensional Approximate Analysis of Three-Dimensional Problems
Even if the process is three-dimensional, there are many cases in which obtaining an approximate solution under a two-dimensional assumption is of engineering value. As a practical example, Figure 11.29 shows a hub forging process development case. As shown in this figure, although the shape of the hub is three-dimensional, this is a case in which process development was successfully accomplished without failure, relying solely on simulation under a two-dimensional assumption.
Figure 11.29 is the first hub-bearing hot closed-die forging product test-produced in Korea after about ten rounds of design refinement relying on simulation technology [11.6]. The reason the experimental result and the analysis result differ in Figure 11.29(a) is that the actual product has a distinct three-dimensional shape. In such a case, it is important to assume a two-dimensional shape that can represent the three-dimensional cross-section.

(a) Analysis and experiment

(b) (left) old product, (right) hub-bearing forged product manufactured by closed-die forging for the first time in Korea
Let us take another example. The part in Figure 11.30(a), strictly speaking, belongs to a three-dimensional problem, but it is close to an axisymmetric shape. Therefore, even if the forging process of this product is analyzed by assuming it to be an axisymmetric process, it belongs to the category of problems that can sufficiently reflect the actual plastic flow phenomenon. The flow stress of the material used in the analysis of this process is \(\bar{\sigma} = 324.0(1.0 + \bar{\varepsilon} / 0.052)^{0.295}\) MPa, and the friction coefficient is 0.05.

Figure 11.30(b) compares the experimental result and the analysis result. The plastic flow in the experimental result shows a large difference from the desired product shape of Figure 11.30(a) that was targeted. However, the experimental result and the prediction result agree well with each other. Figure 11.31 shows the process of change of the metal flow and the structure of defect occurrence. Because the initial shape (preform) in the actual process was made by cutting bar stock, the initial plastic flow lines were generated as shown in the first figure of Figure 11.31. From the visualization of the process of change of the plastic flow lines and the outer shape, the process by which defects occur can be examined in detail. From this result, it can be inferred that solving the problem through partial die modification will not be easy, and it can be recognized that a fundamental revision of the design method is necessary.
Meanwhile, as shown in Figure 11.32, from the comparison of the three-dimensional analysis result and the two-dimensional analysis result, it can be confirmed that the two results have the same meaning at the level of identifying the cause of defect occurrence.

Figure 11.31 Visualization of the growth process of a defect

Figure 11.33, strictly speaking, compares the prediction result and the experimental result of a simulation performed for the purpose of identifying the cause of a piping defect that occurred during a three-dimensional cold forging process. As indicated in Figure 11.33, the outer shape of the cross-section of the middle portion of the workpiece is hexagonal. Therefore, strictly speaking, it belongs to a three-dimensional process. The fundamental problem of this process design can be sufficiently confirmed even with two-dimensional analysis. Because three-dimensional analysis presupposes three-dimensional CAD work, which is relatively time- and cost-intensive, the time cost required for one design-improvement operation and analysis is relatively large. Therefore, to become a competent and reasonable engineer, it is necessary to cultivate the habit of valuing two-dimensional analysis. By analyzing the manufacturing process of long forged products such as connecting rods on a two-dimensional cross-section under the assumption of plane-strain conditions, useful information can be obtained economically.
One of the important things in the structural analysis of a die to identify the cause of die failure is stress concentration. Stress concentration occurs at the concave corners of the die. The smaller the radius of a concave corner, the larger the stress concentration appears. The problem is that, for the analysis of stress concentration, the region where stress concentration occurs must be divided relatively finely into finite elements. When the die shape is relatively complex, performing a finite element division suitable for the stress-concentration analysis of the concave portions requires much cost and effort to obtain the finite element solution. Therefore, if a two-dimensional approach can be grafted on, it is necessary to make active use of it. When producing a relatively long forged product by lateral forging, useful information can be obtained even by analyzing the process two-dimensionally under the assumption of plane strain. The connecting rod and the like are representative examples.
Here, targeting the front-lower-control-arm forging process, we compare the results of two-dimensional plane-strain analysis and three-dimensional analysis and emphasize the practical validity of two-dimensional die structural analysis.

(a) Initial workpiece

(b) Upper die shape

(c) Lower die shape
Figure 11.35 is the finite element analysis result. Figure 11.35(a) is the final predicted shape of the blocking process, and Figure 11.33(b) shows the velocity distribution during the simulation. And Figure 11.36 is the structural analysis result of the lower die at the end point. As shown in the figure, some oscillation occurs in the stress distribution depending on position, and there is a somewhat insufficient aspect in predicting the stress concentration at the corner regions. This is due to the results of the metal forming simulation and the discretization of the die, and there is an unavoidable aspect. For this reason, relying excessively on three-dimensional die analysis technology for the purpose of solving field problems may not be desirable.


Figure 11.35 Three-dimensional die structural analysis result
In order to approximately analyze the stress acting on the die during the forging of a long hot-forged product, a die structural analysis was attempted under the assumption of plane strain, targeting the plane defined by line ABC in Figure 11.35. As shown in Figure 11.35(b), on this plane the velocity component perpendicular to the plane is relatively small. And because it is hot forging, the friction is relatively large, and because the material flow in the length direction is small, the assumption of plane strain is considered appropriate.
Figure 11.37(a) is the cross-section obtained by cutting the final shape of the blocking process of Figure 11.35(a) using line ABC of Figure 11.35(b). The area of this cross-section was calculated to create a two-dimensional plane-strain problem, and the analysis result is shown in Figure 11.37(b). This two-dimensional analysis result was obtained by adjusting the initial position of the workpiece so that the flow shape of the workpiece would come out similar to the three-dimensional result. Figure 11.38(a) shows the metal flow lines and surface-pressure information, and Figure 11.38(b) shows the temperature distribution of the workpiece.

(a) Shape of cross-section ABC from the three-dimensional analysis result

(b) Two-dimensional analysis result for cross-section ABC

(a) Metal flow lines and stress vectors

(b) Temperature distribution of the workpiece
Since a die basically has many corners, careful attention to stress concentration is needed during structural analysis [11.9]. That is, the treatment of concave corners in a finite element analysis model for structural analysis purposes is important. Therefore, in order to sufficiently reflect stress concentration under plane-stress conditions, all concave corners were discretized with eight or more nodes.
Figure 11.39 is the die structural analysis result obtained using mechanical loads, showing the distribution of principal stress and the distribution of effective stress. As shown in Figure 11.39(a), the principal-stress distribution appears large at the concave corner regions, and the effective stress, as shown in Figure 11.39(b), is in the range of 600MPa~800MPa and averages around 700MPa. This result is similar in magnitude to the three-dimensional analysis result. However, the three-dimensional analysis result is less refined than the two-dimensional analysis result. If the two-dimensional analysis result is similar to the three-dimensional analysis result, it is far more useful than the three-dimensional analysis result.

(a) Principal stress

(b) Effective stress
11.8.4 Two-Dimensional and Three-Dimensional Coupled Analysis
As emphasized earlier, it is engineeringly desirable to rely on two-dimensional analysis where possible. However, many processes are axisymmetric in the first part but three-dimensional in a few final stages. In this case, a technique of performing two-dimensional analysis for the first-part axisymmetric process and directly connecting the result to the three-dimensional analysis is useful [11.10].
The automatic multi-stage forging process is a field that urgently needs metal forming simulation technology, and because of the high linkage between processes, the effort required for simulation is far greater. Because the automatic multi-stage cold forging process is finely operated and automation is standard, the process design is relatively precise. Automatic multi-stage forged products are often long products such as bolts, and because they are usually produced at high speed in automatic multi-stage forging machines of four or more stages, precise analysis is needed. And axisymmetric products constitute the mainstream, and, like bolts, in most cases the first-part processes are axisymmetric and a three-dimensional shape is formed in a few final stages. Therefore, in non-axisymmetric-type automatic multi-stage forging that involves axisymmetric processes, precise metal forming simulation technology through the coupling of two-dimensional analysis and three-dimensional analysis is important from a practical standpoint.

(a) Two-dimensional analysis result

(b) Three-dimensional analysis result
Figure 11.40 is the result of analyzing, by the two-dimensional and three-dimensional coupled analysis technique, an automatic five-stage cold forging process that includes the piercing process, which is a relatively difficult process from a metal forming simulation standpoint, and a three-dimensional process in which folding of the material occurs. From the first stage to the fourth stage it is axisymmetric, and piercing is performed at the fourth stage. The fifth stage is non-axisymmetric, and it is a problem in which overlap between the material occurs at the flash portion during forming.
Figure 11.40(a) is a three-dimensional visualization of the result of analyzing the first through fourth stages in two dimensions. By taking the two-dimensional analysis result as input to the three-dimensional metal forming simulator and performing the analysis continuously, precise analysis through two-dimensional and three-dimensional coupling can be carried out. The three-dimensional analysis result of the fifth stage is shown in Figure 11.40(b). By utilizing this function, precise analysis and economical analysis are simultaneously possible.
The flow stress used in the analysis is \(\bar{\sigma} = 617.0 \bar{\varepsilon}^{0.25}\) MPa, and the friction constant is 0.1. Under the assumption that the material is non-rate-dependent, the velocity of the upper die was assumed to be 1.0mm/s.
A process for which two-dimensional/three-dimensional coupled analysis is practically most effective is the screw manufacturing process. Regarding the screw manufacturing process of Figure 11.41, the explanation targets the forging processes excluding the rolling process. Figure 11.41 shows the manufacturing process diagram of a 12-point flange bolt. Up to the fourth stage, it is produced by the automatic multi-stage forging process, and thread rolling is performed at the final stage. The first stage and the second stage are, respectively, an extrusion process and an upsetting process, which form the rough shape of the material. The third stage and the fourth stage are, respectively, a heading process and a backward extrusion process, and these two processes serve to form the head of the screw.
The material is ESW105, and for the friction condition in the forging processes up to the fourth stage, the Coulomb friction law and a friction coefficient of 0.05 were used. Up to the third stage it is axisymmetric, so two-dimensional analysis was performed, and because the head of the screw is formed at the fourth stage, three-dimensional analysis was performed. The predicted deformed shape of the material and the effective strain distribution at the end instant of each process are shown in Figure 11.42.

Figure 11.41 Manufacturing process of a 12-point flange bolt

Figure 11.42 Prediction result - effective strain
This process is suitable for emphasizing the importance of two-dimensional/three-dimensional coupled analysis. Because this process has a relatively long stroke, although the shape is simple, the computation time is long, and in three-dimensional analysis there is a high possibility that numerical problems have a large influence. This is because, in three-dimensional analysis, the volume is inevitably changed artificially depending on the circumferential element density during mesh generation. This problem can be easily understood by considering an inscribed polygon in representing the area of a circle. Of course, this problem does not appear only here. When a cylindrical die is used, this problem always inevitably exists. It is a matter to be careful of when using mesh-related options.
11.9 Evaluation of Analysis Results
11.9.1 Reliability of Analysis Results
In metal forming process analysis, before assigning meaning to the results, in-depth consideration of the validity of the results is required. First and foremost, an understanding of the analysis model of the process to be analyzed must precede everything. In the analysis model, factors that are not based on mechanical phenomena are ignored through boundary conditions or artificial constraint of degrees of freedom, and so on. For example, the instability that occurs at the beginning of the ring rolling process may not be a subject of analysis depending on the analysis model. The analysis model is continuously evolving, but as a theoretical model it maintains a certain distance from the actual problem. Reducing this gap is the main concern of the developer and the duty of the user.
And the convergence of the solution can become a problem, and part of the material can be lost during the remeshing process. In particular, in problems with frequent remeshing such as forging, volume change can occur due to artificial shape change. Volume change also occurs to some extent when the analysis step size is large. Volume change can also be caused, depending on the technique, in the process of handling the contact condition between the material and the die. Moreover, the technique used to handle the incompressibility condition and the convergence characteristics of the analysis result are also factors of volume change. Using a somewhat coarse mesh can also be a factor that worsens the volume-change problem. Of course, in rigid-plastic finite element analysis, the Lagrange multiplier method is advantageous over the penalty method not only in analysis accuracy but also in terms of volume change. However, the penalty method has an advantage in terms of analysis time.
Artificial volume change during analysis is directly linked to the reliability of the analysis result. Therefore, before utilizing the analysis result, the validity of the volume change must be investigated. In theory, it is assumed in most cases that there is no volume change. Therefore, in the theoretical solution, the smaller the volume change, the better. However, due to the factors described above, volume change has an unavoidable aspect.
However, unlike theory, it is known that when an actual material undergoes compressive deformation, a slight (about 1-2%) volume change occurs. In actual metal forming, the volume inevitably changes not only due to compressive and tensile deformation of the material but also due to cooling or heating of the material. Considering this, in the analysis of metal forming processes, a volume change of about 2% may be acceptable.
If the volume-change compensation function was activated during the analysis, the absence of volume change does not guarantee reliability. However, in problems with severe volume change, the use of this function has the significance of avoiding the worst case. What we wish to emphasize here is that much experience and theoretical support are needed to understand the meaning that volume change carries in the analysis result.
Commercial software generally provides the aforementioned volume-change compensation technique. In some cases, the use of such a function can be essential. For example, problems in this category include the analysis of complex forging processes in which remeshing occurs frequently, or cases in which there is directionality in the motion and deformation of the material, such as ring rolling. However, above all, it is important to find analysis conditions that satisfy an acceptable volume change without relying on such an artificial volume-compensation function.
11.9.2 Forming Load
The factor that directly affects the forming load is the flow stress. Precise prediction of the forming load at room temperature is relatively easy. This is because, due to low friction, the influence of the flow stress on the forming load is absolute, and the influence of the effective strain on the flow stress is absolute.
However, hot metal forming differs greatly from cold metal forming in this respect. This is because not only the flow stress but also friction is a major variable. Factors that affect the flow stress at high temperature include temperature, strain rate, strain, and so on. The problem of quantifying the influence of these factors can be steadily improved along with the advancement of testing technology and flow stress models. In contrast, clarifying the friction state to an appropriate level from an engineering standpoint is not easy.
When hot material and die come into contact in a lubricant-free state, as in rough rolling, the friction coefficient is known to be 0.3 or higher [11.11]. In the case of lubricant-free hot forging, productivity drops greatly due to severe die wear. Therefore, lubrication has a large influence on friction and die wear. Compared with flow stress, clarifying the friction state under lubrication is not easy. From an analysis standpoint, as revealed in Section 5.7.1, even though coefficients or constants of equivalent conditions were applied according to the friction law, the forming load can differ by about 30%. The prediction result of the flow lines in hot forging is also sensitively affected by the friction condition and friction model.
Figure 11.43 is a hot forging process for analyzing the influence of the friction model and friction coefficient or friction constant on the forming load and flow lines in the hot forging process of a bearing part. The material is SCr420H, and a 2500-ton slide-crank press was used.
The Coulomb friction law, the constant-shear friction law, and the hybrid friction law were used, and as shown in Table 11-1, the predicted maximum forming loads for various friction conditions are shown. As shown in this table, it can be seen that the forming load varies greatly depending on the friction condition. This difference can be further intensified depending on the geometric differences of the process.
Meanwhile, Figure 11.44 compares the flow line prediction results according to the friction model and friction condition. The predicted flow lines differ greatly from one another. From this result, it can be seen that in determining the friction model and friction condition, the forming load and the flow lines must be considered simultaneously.
[Table 11-1] Friction model and friction condition versus maximum forming load (Coulomb friction)
| Case | Friction coefficient | Maximum forming load |
|---|---|---|
| 1.1 | 0.1 | 1885 |
| 1.2 | 0.2 | 2365 |
| 1.3 | 0.3 | 2680 |
[Table 11-2] Friction model and friction condition versus maximum forming load (constant-shear friction)
| Case | Friction constant | Maximum forming load |
|---|---|---|
| 2.1 | 0.2 | 1630 |
| 2.2 | 0.4 | 1890 |
| 2.3 | 0.6 | 2190 |
[Table 11-3] Friction model and friction condition versus maximum forming load (hybrid friction)
| Case | Friction coefficient/limiting friction constant | Maximum forming load |
|---|---|---|
| 3.1 | 0.1 / 0.2 | 1555 |
| 3.2 | 0.1 / 0.4 | 1795 |
| 3.3 | 0.1 / 0.6 | 1825 |
| 3.4 | 0.2 / 0.4 | 1840 |
| 3.5 | 0.2 / 0.6 | 2170 |
| 3.6 | 0.3 / 0.6 | 2270 |


11.9.3 Analysis of the Influence of Mechanical Modeling of Material and Die
In this section, through the forging process analysis of a fixed scroll, we introduce comparison results obtained to analyze the influence of the material model and the die model on the finite element prediction results.
Figure 11.45 illustrates an example of die fracture that occurs during the hot forging of an aluminum fixed scroll used in the air-conditioning compressor unit of an automobile. Fracture occurred prematurely at the root of the wrap around the region indicated by the red box. The scroll shape is characterized by a geometry that can amplify the effect of the response to die deformation, and the influence of the theoretical material model on the finite element prediction results can be quantitatively evaluated. Figure 11.46 shows the process diagram of the fixed scroll. The flow stress and thermal information of the material are summarized in Chapter 7 and Chapter 12. The die velocity was assumed to be a constant 200mm/s, and the Coulomb friction coefficient is 0.2. The Young's modulus, Poisson's ratio, and thermal expansion coefficient of the die material are 210MPa, 0.28, and 0.000012/°C, respectively, and the initial temperatures of the material and die are 450°C and 180°C, respectively.

Figure 11.45 Die fracture that occurred during the forging of a fixed scroll

Figure 11.46 Conceptual diagram of the fixed scroll forging process
Under the judgment that the elastic deformation effect of the forging material can be neglected due to the initially high temperature of 450°C, it is assumed to be viscous or thermo-viscous, and the die material is assumed to be rigid or elastic. The four cases summarized in Table 11-4 are intended not only to identify the cause of die fracture but also to provide insight into the influence of the forging material model on the finite element prediction. In the cases of Case 1 and Case 3, which are rigid die models, the die stress was calculated separately from the flow analysis of the material and, after the flow simulation, calculated using a post-processing function. In Case 2 and Case 4, the influence of the elastic deformation of the die was considered, and this is called complete analysis.
[Table 11-4] Number of analysis cases
| Forging material | Die | |
|---|---|---|
| Case 1 | Visco-plastic | Rigid |
| Case 2 | Visco-plastic | Elastic |
| Case 3 | Thermo-visco-plastic | Rigid |
| Case 4 | Thermo-visco-plastic | Elastic |
Figure 11.47(a) and Figure 11.47(b) are the finite element meshes for the material and die used in the analysis. The numbers of tetrahedral elements of the material and die are about 145,000 and 125,000, respectively.

Figure 11.47 Finite element mesh and definition of cross-sections (C1 plane, C2 plane)
Figure 11.48(a) and Figure 11.48(b) show, respectively, the change of the flow lines and temperature for Case 4. The flow lines are generally sound, and the temperatures of the material and die remain between 317°C and 470°C and between 180°C and 253°C, respectively. In the four cases, the overall flow line prediction results are similar, and slight differences arise toward the end.
Figure 11.49 shows the change of the forming load and the maximum \(\sigma_{yy}\) around the die fracture region according to elapsed time in Case 4. At an elapsed time of 0.068 seconds, the stress component \(\sigma_{yy}\) reaches its maximum value of 1160MPa around the fracture region of the die. After that, as in Figure 11.49, this stress component decreased sharply. As shown in Figure 11.50, because the opposite face of the fracture region of the die was in a compressive state, the stress distribution is similar to the phenomenon of a cantilever beam. Considering the relatively low tensile strength of the die material compared with its compressive strength, it can be concluded that the brittle characteristic of the die material, with a maximum tensile stress of 1160MPa in Case 4, is the cause of the early die fracture. A point to note here is that the time at which the maximum tensile stress acting on the die occurs and the time at which the maximum load is reached are different. This appeared in a similar manner in the other cases as well (see Figure 11.51 and Figure 11.55).

Figure 11.48 Prediction result of Case 4

Figure 11.49 Change of the forming load and the stress component σyy at the fracture point (Case 4)

Figure 11.50 Distribution of the stress component σyy (MPa) at the fracture point (Case 4)
Earlier we emphasized that this test process is peculiar because the relationship between the forming load and the maximum σyy that causes die fracture is weak. Die fracture was found to occur not at the final instant when the maximum forming load occurs, but at the point where the forming load reaches about 70% of the maximum forming load. That is, the magnitude of the forming load itself has a secondary influence on die fracture, and this is a very exceptional case in forging processes. Therefore, this provides an opportunity to evaluate the influence of the material and die models on the prediction of the finite element analysis. Figure 11.51 compares the change of the forming load over time for the four cases, and overall it does not show a large difference. However, when the elastic deformation of the die or the influence of heat transfer is considered, as can be seen in Figure 11.51, the time at which the change of load begins over the course of time lies between 0.0625 seconds (Case 4) and 0.065 seconds (Case 1). It is natural that the forming load obtained by non-isothermal analysis is larger than the forming load obtained by isothermal analysis, when the initial temperature is the same, due to the temperature drop of the material. From Figure 11.51, it can be seen that the forming load obtained when elastic deformation is considered becomes larger than the forming load obtained in rigid-plastic analysis. Figure 11.52 shows that the relatively larger forming load, as predicted by Case 4, occurs due to the reduction of the exit region—that is, the rise in the extrusion ratio—as a result of the bending of the wrap and the relatively small deformation of the outer die. This phenomenon was also predicted in Case 2.

Figure 11.51 Change of the forming load over time

Figure 11.52 Deformation of the die (the real numbers represent the lateral displacement) (Case 4)

Figure 11.53 Flow lines and material-die contact state at 0.0625 seconds (Case 4)
In Figure 11.53, it can be seen that the change in the slope of the forming load at 0.0625 seconds predicted by Case 4 occurs as the material touches the bottom of the region marked 'T' between the scrolls. The change in the slope of the σyy value occurs more sharply in the rigid analysis than in the case that considers die elastic deformation.
As can be seen in Figure 11.48(b), because the temperature becomes lower as the material moves away from the center, this means that the temperature distribution that increases the deformation resistance causes the slope change earlier. Due to the prediction of a somewhat earlier contact time, the temperature and die elastic-deformation effects can be regarded as predicting a smooth slope transition of the forming load. As shown in Figure 11.54, at an elapsed time of 0.06 seconds, the leftmost material width predicted by Case 4 is smaller than that predicted by Case 1. This means that in Case 4 the material reaches the die bottom first, but due to the reverse-gradient deformation of the die, complete contact between the material and die does not occur. In contrast, when a rigid die is used, geometrically complete contact occurs, but mechanical contact is not perfectly achieved. Understanding this phenomenon is very important for judging the influence of the analysis model, i.e. the material model and the die model, on the analysis results—that is, the differences in the history of the forming load and die stress and subtle phenomena. For example, the mechanical non-contact when using a rigid die makes it impossible to predict the lateral wear occurring in the scroll forging die that can be confirmed in Figure 11.45.
In Figure 11.54, in Case 4, due to die elastic deformation, the inlet narrows and the width of the lower portion widens; as a result, the width of the extruded material is narrow and the empty space is gradually filled. This causes a subtle problem and provides important information for understanding analysis technology and process technology.

Figure 11.54 Comparison of the plastic flow occurring in the left space
Figure 11.55 compares the change of the stress component \(\sigma_{yy}\) at the die fracture region according to elapsed time. Until about 0.055 seconds, the structurally weak region maintains a mechanically stable state, but from about 0.060 seconds onward the situation changes greatly. As shown in Figure 11.55(a), the time taken to obtain the maximum \(\sigma_{yy}\) is similar for all four conditions, but a theoretically meaningful difference can be observed in the curve of Figure 11.55(b) between 0.055 seconds and 0.068 seconds. As can be seen from this graph, when the effect of elastic deformation or heat transfer is considered, the time at which the maximum \(\sigma_{yy}\) curve of Figure 11.55(b) is reached is, from left to right, in the order Case 4, Case 2, Case 3, and Case 1, and in the case of Case 4 the maximum stress occurs at 0.0625 seconds. This difference, as already explained, depends on whether elastic deformation or heat transfer is considered.
Figures 11.53 and 11.56 show that the material flow pattern of Case 4 changes radically after an elapse of 0.0625 seconds. Immediately after the die surface marked 'T' in Figure 11.53 contacts the material, contact begins to occur at the end of the weak wrap, where the application of force is structurally not easy, as shown in Figure 11.56. This is the reason the sharp increase in the slope of \(\sigma_{yy}\) occurs at about 0.0625 seconds. As can be seen in Figure 11.56, the compressive stress applied to the upper part of the wrap due to the sharp increase in the forming load flattens the slope of the die pressure \(\sigma_{yy}\) at the fracture region (see Figure 11.59).

Figure 11.55 Change of σyy at the fracture point

Figure 11.56 Change of material-die contact over time (Case 4)
The elastic deformation of the die, i.e. the bending deformation, reduces the rate at which the material fills the cavity of the die valley, affecting not only the change of the maximum \(\sigma_{yy}\) acting on the die but also the change of the material deformation, the forming load, and the maximum \(\sigma_{yy}\). The temperature drop of the material causes the change of the maximum \(\sigma_{yy}\), as can be seen in Figure 11.57(b). This is due to the increased flow stress in the cooled region of the material, which prevents the material from filling the outer cavity of the die, as shown in Figure 11.57, increasing the lateral force and bending of the outer wrap. This phenomenon is illustrated in Figure 11.58, where the value in mm units represents the maximum gap between the die and the material. However, as can be seen in the two rigid analyses, because whether or not temperature is considered does not contribute greatly to producing the narrowed width of the extruded material, it is believed that temperature does not have a direct influence on the change of the forming load and the maximum \(\sigma_{yy}\).

Figure 11.57 Effective stress, effective strain rate, and temperature of the material at 0.068 seconds (the numbers in parentheses, in ℃) (Case 3)
Figure 11.58 compares the flow lines immediately after the elapsed time of 0.063 seconds, when the slope of the \(\sigma_{yy}\) curve at the fracture instant clearly changes as shown in Figure 11.55. When die elastic deformation is considered, because the bending of the die wrap decelerates the material flow into the outer die cavity, it produces differences in the flow lines and the degree of cavity filling.
The influence of temperature on the material can also be observed in Figure 11.58. Comparing the difference between Case 1 and Case 3 and the difference between Case 2 and Case 4, it can be seen that the influence of temperature is relatively small. In Figure 11.58 and Figure 11.55, the close relationship between the filling of the die cavity around the die fracture region and \(\sigma_{yy}\) can be confirmed, and Figure 11.59 shows this more clearly. After about 0.06 seconds, the bottom surface around the fracture point begins to contact the material, so the pressure on the left wall of the wrap increases and it is pushed outward. Therefore, the change in the contact load increases \(\sigma_{yy}\) at the fracture point regardless of the forming load.
In Figure 11.59, it can be seen that the sharp increase in pressure on the left wall occurred between 0.060 seconds and 0.065 seconds, and this is related to the sharp increase in \(\sigma_{yy}\) at the fracture point shown in Figure 11.55(b).
The foregoing analysis is helpful not only for understanding the influence of the material model and the die model, but will also be helpful for understanding the theory and practice of simulation technology.

Figure 11.58 Comparison of flow lines and the unfilled space at an elapsed time of 0.063 seconds

Figure 11.59 Change of the material-die contact surface (the dark portion in (a)) and contact stress over time (Case 1)